
本文主要是直播界面中点赞效果,当然也可以用OpenGL去做。
两
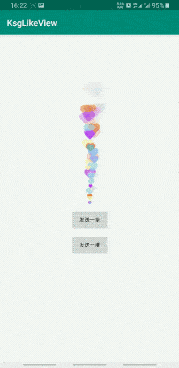
先来展示下效果图:

大家看到效果应该都不陌生,网上已经有很多相同的效果,但是网上大多是通过动画来实现,而我这个是通过自定义 SurfaceView 来实现。这个想法主要来自于反编译映客 App,虽然看不到源码,但给我提供了思路。接下来进入正题~
1. 自定义 SurfaceView 巩固
自定义 SurfaceView 需要三点:继承 SurfaceView、实现SurfaceHolder.Callback、提供渲染线程。
继承 SurfaceView不需要多说,说一下 SurfaceHolder.Callback 需要实现的三个方法:
-
public void surfaceCreated(SurfaceHolder holder) : 当 Surface 第一次创建后会立即调用该函数。程序可以在该函数中做些和绘制界面相关的初始化工作,一般情况下都是在另外的线程来绘制界面,所以不要在这个函数中绘制 Surface。
-
public void surfaceChanged(SurfaceHolder holder, int format, int width, int height) : 当 Surface 的状态(大小和格式)发生变化的时候会调用该函数,在 surfaceCreated() 调用后该函数至少会被调用一次。
-
public void surfaceDestroyed(SurfaceHolder holder) : 当 Surface 被销毁前会调用该函数,该函数被调用后就不能继续使用 Surface 了,一般在该函数中来清理使用的资源。
下面提供一个自定义 SurfaceView 的一个简单模板:
-
public class SimpleSurfaceView extends SurfaceView -
implements SurfaceHolder.Callback, Runnable { -
-
// 子线程标志位 -
private boolean isRunning; -
-
//画笔 -
private Paint mPaint; -
-
public SimpleSurfaceView(Context context) { -
super(context, null); -
} -
-
public SimpleSurfaceView(Context context, AttributeSet attrs) { -
super(context, attrs); -
init(); -
} -
-
-
private void init() { -
mPaint = new Paint(); -
mPaint.setAntiAlias(true); -
//... -
getHolder().addCallback(this); -
setFocusable(true); -
setFocusableInTouchMode(true); -
this.setKeepScreenOn(true); -
} -
-
@Override -
public void surfaceCreated(SurfaceHolder holder) { -
isRunning = true; -
//启动渲染线程 -
new Thread(this).start(); -
} -
-
@Override -
public void surfaceChanged(SurfaceHolder holder, -
int format, int width, int height) { -
} -
-
@Override -
public void surfaceDestroyed(SurfaceHolder holder) { -
isRunning = false; -
} -
-
@Override -
public void run() { -
while (isRunning) { -
Canvas canvas = null; -
try { -
canvas = getHolder().lockCanvas(); -
if (canvas != null) { -
// draw something -
drawSomething(canvas); -
} -
} catch (Exception e) { -
e.printStackTrace(); -
} finally { -
if (canvas != null) { -
getHolder().unlockCanvasAndPost(canvas); -
} -
} -
} -
} -
-
/** -
* draw something -
* -
* @param canvas -
*/ -
private void drawSomething(Canvas canvas) { -
-
} -
}
2. HeartView 实现
HeartView 实现主要分为3部分:
-
初始化值,向集合中添加 Heart 对象
-
通过三阶贝塞尔曲线实时计算每个 Heart 对象的坐标
-
在渲染线程遍历集合,画出 bitmap
首先说下三阶贝塞尔曲线的几个主要参数:起始点、结束点、控制点1、控制点2、时间(从 0 到 1 )。对贝塞尔曲线不了解的或者想更详细的了解的可以看一下 Path 之贝塞尔曲线 这边文章。
接着来看一下 Heart 类中的主要属性:
-
public class Heart { -
-
//实时坐标 -
private float x; -
private float y; -
-
//起始点坐标 -
private float startX; -
private float startY; -
-
//结束点坐标 -
private float endX; -
private float endY; -
-
//三阶贝塞尔曲线(两个控制点) -
//控制点1坐标 -
private float control1X; -
private float control1Y; -
-
//控制点2坐标 -
private float control2X; -
private float control2Y; -
-
//实时的时间 -
private float t=0; -
//速率 -
private float speed; -
}
通过三阶贝塞尔曲线函数来计算实时坐标的公式如下:
-
//三阶贝塞尔曲线函数 -
float x = (float) (Math.pow((1 - t), 3) * start.x + -
3 * t * Math.pow((1 - t), 2) * control1.x + -
3 * Math.pow(t, 2) * (1 - t) * control2.x + -
Math.pow(t, 3) * end.x); -
-
float y = (float) (Math.pow((1 - t), 3) * start.y + -
3 * t * Math.pow((1 - t), 2) * control1.y + -
3 * Math.pow(t, 2) * (1 - t) * control2.y + -
Math.pow(t, 3) * end.y);
有了公式,有了 Heart 类,我们还需要在 Heart 初始化的时候,给它的属性随机设置初始值,代码如下:
-
//Heart.java -
-
/** -
* 重置下x,y坐标 -
* 位置在最底部的中间 -
* -
* @param x -
* @param y -
*/ -
public void initXY(float x, float y) { -
this.x = x; -
this.y = y; -
} -
-
/** -
* 重置起始点和结束点 -
* -
* @param width -
* @param height -
*/ -
public void initStartAndEnd(float width, float height) { -
//起始点和结束点为view的正下方和正上方 -
this.startX = width / 2; -
this.startY = height; -
this.endX = width / 2; -
this.endY = 0; -
initXY(startX,startY); -
} -
-
/** -
* 重置控制点坐标 -
* -
* @param width -
* @param height -
*/ -
public void initControl(float width, float height) { -
//随机生成控制点1 -
this.control1X = (float) (Math.random() * width); -
this.control1Y = (float) (Math.random() * height); -
-
//随机生成控制点2 -
this.control2X = (float) (Math.random() * width); -
this.control2Y = (float) (Math.random() * height); -
-
//如果两个点重合,重新生成控制点 -
if (this.control1X == this.control2X -
&& this.control1Y == this.control2Y) { -
initControl(width, height); -
} -
} -
-
/** -
* 重置速率 -
*/ -
public void initSpeed() { -
//随机速率 -
this.speed = (float) (Math.random() * 0.01 + 0.003); -
} -
-
//HeartView.java -
/** -
* 添加heart -
*/ -
public void addHeart() { -
Heart heart = new Heart(); -
initHeart(heart); -
mHearts.add(heart); -
} -
-
/** -
* 重置 Heart 属性 -
* -
* @param heart -
*/ -
private void initHeart(Heart heart) { -
//mWidth、mHeight 分别为 view 的宽、高 -
heart.initStartAndEnd(mWidth, mHeight); -
heart.initControl(mWidth, mHeight); -
heart.initSpeed(); -
}
万事具备,只欠东风。属性都已经准备就绪,接下来就开始画了:
-
//HeartView.java -
@Override -
public void run() { -
while (isRunning) { -
Canvas canvas = null; -
try { -
canvas = getHolder().lockCanvas(); -
if (canvas != null) { -
//开始画 -
drawHeart(canvas); -
} -
} catch (Exception e) { -
Log.e(TAG, "run: " + e.getMessage()); -
} finally { -
if (canvas != null) { -
getHolder().unlockCanvasAndPost(canvas); -
} -
} -
} -
} -
-
/** -
* 画集合内的心形 -
* @param canvas -
*/ -
private void drawHeart(Canvas canvas) { -
//清屏~ -
canvas.drawColor(Color.TRANSPARENT, PorterDuff.Mode.CLEAR); -
for (Heart heart : mHearts) { -
if (mBitmapSparseArray.get(heart.getType()) == null) { -
continue; -
} -
//会覆盖掉之前的x,y数值 -
mMatrix.setTranslate(0, 0); -
//位移到x,y -
mMatrix.postTranslate(heart.getX(), heart.getY()); -
//缩放 -
//mMatrix.postScale(); -
//旋转 -
//mMatrix.postRotate(); -
//画bitmap -
canvas.drawBitmap(mBitmapSparseArray.get( -
heart.getType()), mMatrix, mPaint); -
//计算时间 -
if (heart.getT() < 1) { -
heart.setT(heart.getT() + heart.getSpeed()); -
//计算下次画的时候,x,y坐标 -
handleBezierXY(heart); -
} else { -
removeHeart(heart); -
} -
} -
} -
-
/** -
* 计算实时的点坐标 -
* -
* @param heart -
*/ -
private void handleBezierXY(Heart heart) { -
float x = (float) (Math.pow((1 - heart.getT()), -
3) * heart.getStartX() + -
3 * heart.getT() * Math.pow((1 - -
heart.getT()), 2) * heart.getControl1X() + -
3 * Math.pow(heart.getT(), 2) -
* (1 - heart.getT()) * heart.getControl2X() + -
-
Math.pow(heart.getT(), 3) * -
heart.getEndX()); -
-
float y = (float) (Math.pow((1 - heart.getT()), -
3) * heart.getStartY() + -
-
3 * heart.getT() * Math.pow((1 - -
heart.getT()), 2) -
* heart.getControl1Y() + -
3 * Math.pow(heart.getT(), 2) -
* (1 - heart.getT()) * heart.getControl2Y() + -
Math.pow(heart.getT(), 3) * -
heart.getEndY()); -
-
heart.setX(x); -
heart.setY(y); -
}
画完了,然我们写在 demo 里欣赏一下效果吧,使用代码如下:
-
//xml -
<com.zyyoona7.heartlib.HeartView -
android:id="@+id/heart_view" -
android:layout_width="250dp" -
android:layout_height="250dp" -
android:layout_alignParentRight="true" -
android:layout_alignParentBottom="true" -
android:layout_marginBottom="40dp"/> -
//java -
mHeartView = (HeartView) findViewById(R.id.heart_view); -
mHeartView.addHeart();
大功告成,效果图就回到顶部查看吧~需要查看完整代码请点击 Github 地址:HeartView